Vertical Panoramas of New York Churches by Richard Silver
Photographer Richard Silver has published a new series of vertical church panoramas, this time of his native New York. Despite only becoming a full-time photographer in 2011, his work has already been featured by companies such as Tiffany and Co., UNITED Airlines, TimeOut New York, and others. These vertical panoramas were composed from 6-10 shots.
“Finding the perfect location in the center aisle then shooting vertically from the pew to the back of the church gives the perspective that only architecture of this style can portray,” Silver told Colossal. “This is a technique that I have been working on for a few years now. It is a unique way of photographing church interiors through a vertical panorama,” he added in a separate interview with Pixable.
Church of St. Vincent Ferrer
Church of St. Stephen / Church of St. Paul the Apostle
Church of St. Francis Xavier
Serbian Orthodox Cathedral of St. Sava / Church of the Village
A Monumental Sculpture of Colorful Twine Netting Suspended Above Boston
One hundred miles of twine compose this public sculpture of suspended netting above Boston, a structure that spans the void of an elevated highway that once split downtown Boston from its waterfront. The artist, Janet Echelman designed the artwork titled AsIf It Were Already Here to reflect the history of the installation’s location. Echelman also intended the piece to be a visual metaphor—a way to “visually knit together the fabric of the city with art,” she explains.
The installation is 600 feet at its widest, including over 500,000 knots for structural support. Each time one section of the sculpture sways or vibrates in the wind the other parts follow suit, undulating as a single form 600 feet in the sky. As the day progresses the 1,000-pound structure’s webbed surface begins to glow, becoming a beacon in the sky rather than blending into the blue above it. In addition to moving with the wind, the structure also glows in response to sensors that register tension and project light onto the sculpture.
As If It Were Already Here is just one of Echelman’s enormous sculptures, she’s also installed pieces in Montreal,Seattle, and elsewhere. Echelman received the Guggenheim Fellowship, the Harvard University Loeb Fellowship, a Fulbright Lectureship, and was named an Architectural Digest Innovator for “changing the very essence of urban spaces.” You can see Echelman speak about her other environmentally-responsive sculptures in her TED talk here. (via Beautiful Decay)
Jagged Wood Fragments Find New Purpose When Fused with Resin by Jeweler Britta Boeckmann
Melbourne-based designer and jeweler Britta Boeckmann has a way of seeing the perfect in the imperfect, a skill she uses to form a hugely diverse array of wearable objects from fused wood and resin. Each pendant, ring, or pair of earrings is made one at a time by hand without the aid of template, a process that allows the pieces to evolve organically as she works.
After graduating in 2013 with an industrial design degree, Boeckmann moved from Germany to Melbourne (by way of London) where she joined the Wangaratta Woodworkers studio. Working three times a week she quickly perfected her jewelry fabrication techniques and soon found a market for her wares. Boeckmann now has her own studio and sells her pieces online under the brand “BoldB” on Etsy. You can see an archive of her design on her website. (via So Super Awesome)
Soviet-Era Architecture: Brodsky & Utkin Imagined Fantastical Structures on Paper
Hill with a Hole, 1987/90 . Courtesy of Ronald Feldman Fine Arts Inc.
To be an architect with vision in the Soviet Union during the 1970s and 80s, was to witness a near complete loss of Moscow’s historical architectural heritage. Restrictions on aesthetics, quality building materials, and access to skilled labor resulted in poorly designed structures void of inspiration that were practically destined to crumble. Architects with any shred of ambition were severely limited by communist bureaucracy and were often outright penalized for their ideas. Desperately seeking a creative outlet, these constrained artists and designers turned instead to paper.
Perhaps the most vivid example of this is the work of renowned Soviet “paper architects” Alexander Brodsky and Ilya Utkin who from 1978 to 1993, retreated into their imaginations to create fantastical etchings as a revolt against communist architecture. Paper architecture (or visionary architecture), is the name given to architecture that exists only on paper that possesses visionary, often impossible ideas interlaced with whimsey, humor, satire, and science fiction.
Building on ideas borrowed from Claude Nicolas Ledoux, the design of Egyptian tombs, and urban master plans envisioned by Le Corbusier, the duo conceived of obsessively detailed renderings that seems to fill every inch of the canvas with buildings, bridges, arches, domes, and schematics. Through these artworks, Brodsky & Utkin criticized the aesthetic norms of the day until their partnership ended shortly after the fall of the Soviet Union.
Princeton Architectural Press just released the third edition of Brodsky & Utkin, a large volume containing 30 duotones from the artists, but also includes “an updated preface by the artists’ gallery representative, Ron Feldman, a new introductory essay by architect Aleksandr Mergold, visual documentation of the duo’s installation work, and rare personal photographs.” Several Brodsky & Utkin prints are also currently on view at Tate Modern. (via Hyperallergic)
Courtesy of Ronald Feldman Fine Arts Inc.
Contemporary Architectural Art Museum, 1988/90 . Courtesy of Ronald Feldman Fine Arts Inc.
Diomede, 1989/90 . Courtesy of Ronald Feldman Fine Arts Inc.
Doll’s House, 1990 . Courtesy of Ronald Feldman Fine Arts Inc.
Dwelling House of Winnie-the-Pooh, 1990. Courtesy of Ronald Feldman Fine Arts Inc.
Glass Tower II, 1984/90. Courtesy of Ronald Feldman Fine Arts Inc.
Ship of Fools or a Wooden Skyscraper for the Jolly Company, 1988/90. Courtesy of Ronald Feldman Fine Arts Inc.
Villa Nautilus, 1990. Courtesy of Ronald Feldman Fine Arts Inc.
I’ve got to be honest. I don’t make enough things for the men in my life. Nor do they ever seem to be able to easily find patterns or crafts that interest them. I wanted to change all that by creating a simple tutorial that anyone could use to create a neat bow-tie that's perfect for any occasion.
If you already have a bow tie at hand you can use this to make your template. If you don't have a bow tie, move directly on to Step 2. Fold it in half and trace the outline onto paper.
2. Make a Template Without a Bow Tie
If you don’t have a bow-tie, you can use the template I’ve made. All you need to do is measure around your neck and divide that number by two. We’ll call this measurement (neck circumference divided by 2) your half-neck measurement.
Sketch out a rectangle that is as long as your half-neck measurement and 7/8in (or 2cm) wide.
Print and cut out the bow-tie-template and attached this to your rectangle. You now have a bow-tie template.
3. Prepare Your Materials
Step 1
Cut out your template.
Step 2
Fold your fabric in half - I'm using a blue denim fabric. Make sure it is wide enough to fit your template.
Step 3
Place your bow tie template on the fold.
Step 4
Use tailor’s chalk to trace around your template. Use a solid line.
Step 5
Now add the seam allowance. Use a ruler to add 3/8in (or 1cm) around the outside of your chalk outline. Use a dashed line.
Step 6
Cut out your fabric.
Repeat steps 2 to 5 to create another bow tie piece. You should now have two full-length bow tie pieces.
4. Add Interfacing
Fold your interfacing in half. Make sure it is wide enough to fit your bow tie template.
Place your bow tie template on the fold. Trace around your template and then cut out. Repeat so you have two long pieces of interfacing. They will be the same as the fabric you cut out earlier, except they won’t have any seam allowance added.
Iron the cut-out interfacing onto the wrong side of your fabric.
5. Assemble Your Bow Tie
Step 1
Place your two pieces of fabric right sides together. Pin in place.
Sew around the bow tie, leaving a 3/8in (or 1cm) seam allowance.
Be sure to leave a gap of 1in (or 3cm) on one long side of the bow tie.
Step 2
Trim the seam allowance so that it's as close to the stitches as possible.
Step 3
Turn your bow tie inside out, using the gap that you left in the long side.
You may find it helpful to use a chopstick to turn the fabric inside out.
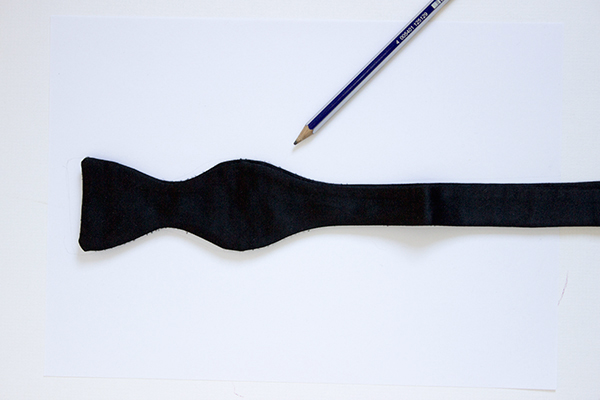
Step 4
Once the bow tie has both sides turned to the right side, give the whole bow tie a good press with an iron.
In the gap you created, make sure you turn the seam allowance under and press.
Step 5
Sew the gap closed using a sewing needle and an invisible stitch.
Wear Your Smart New Bow Tie
And you’re finished. Well done!
I used a dark denim in this tutorial, but you could use anything you fancy. How about a rich silk, or something a little less serious in a fun cotton print? Liberty print fabric always looks great! Now that you’ve seen how easy it is to make a bow tie, you can create a whole wardrobe of bow ties in a rainbow of colors and prints!
Now that you’ve seen how easy it is to make a bow tie, you can create a whole wardrobe of bow ties in a rainbow of colors and prints! Let us know how you went with this tutorial. Do you have any other ideas you'd like to see for dude craft?